Traverse Global v11.2
Site Settings
The Site Settings function allows you to select Traverse companies to make available for the Customer web portal. When you open the Site Settings function, you will see a list of companies that have been added to the customer web portal.
You can make changes to the site settings only for companies you have permission to access.

Online Availability
If you wish to remove a company from the web portal, clear the Online check box for that company. To make the company available to the web portal, mark the Online check box for that company.
Data Synchronization
Because the Customer Portal database is separate from the Traverse database, changes that affect records in both databases must be synchronized. These changes include inventory items, customer information, or payment information.
To perform a manual synchronization, use the Synchronize icon for the company you wish to synchronize.
To add a company to the customer web portal:
- In the Customer Portal Manager drop-down list, select Site Settings.
- A list of companies accessible through the portal appears. To add a company, use the Add icon.
- In the Add Company dialog box, select a company to add to the list from the Select Company drop-down list, then use the Update link.
- To allow the company access to the customer web portal, make sure you mark the Online check box. If you do not want the company accessible from the web portal, clear the Online check box.
- Complete the company configuration by using the Edit Company instructions below.
- Click the Save icon to save the newly-added company.
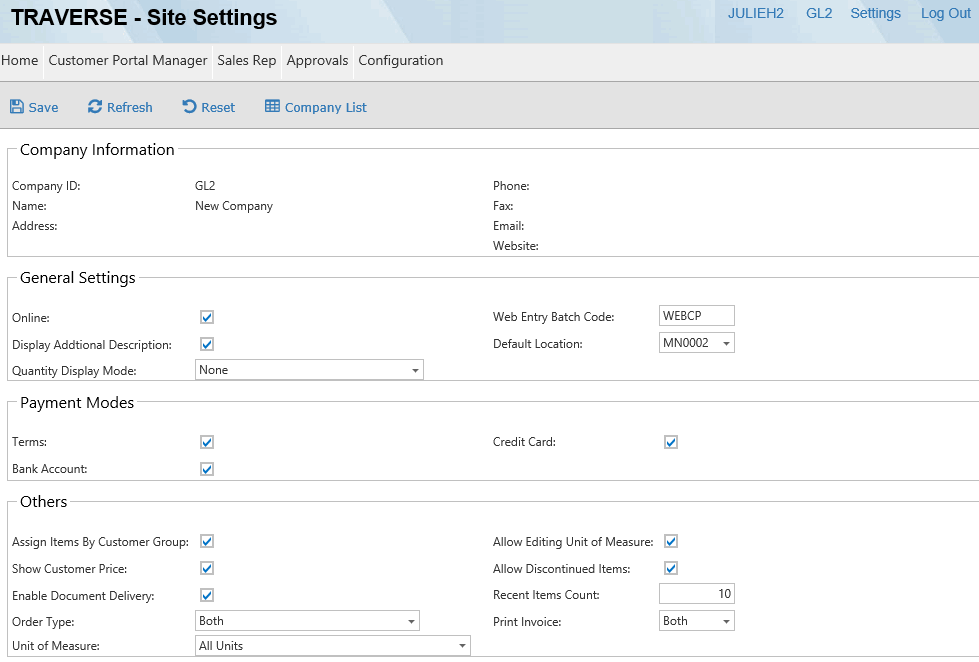
You use the Edit Company function to configure the basic customer portal settings for each company. Use the Edit icon to open the configuration screen.
The company information that appears in the configure company screen is from the SM Company table.

- Mark the Online check box to make the company available in the web portal.
- Enter a batch code for transactions entered through the portal into the Web Entry Batch Code field. Maximum length is 6 characters.
- If you wish to see additional descriptions for items in the customer web portal, mark the Display Additional Description check box.
- Select an inventory location to use for transactions from the portal in the Default Location field from the drop-down list. Only the items assigned to this location will be available in the customer portal.
- Select a Quantity Display Mode, which determines how the system will display information about the quantities available:
- None - Will not show a Quantity when they drill into an item from the web app
- Text - Will show the available Quantity as either "Available" or "Unavailable"
- Quantity - Will numerically show the available Quantity (both positive and negative quantities)
Note: The Batch Code must exist in Traverse Sales Order.
- Mark the Terms, Credit Card, and/or Bank Account check boxes to enable those payment modes in the web portal.
You can set some defaults for how the portal behaves with the options in the Others section:
- Mark the Assign Items by Customer Group check box to assign available online items to specific customer groups.
- To show the customer price, mark the Show Customer Price check box.
- To allow the user to edit the unit of measure, that is, select a different unit of measures, mark the Allow Editing Unit of Measure check box.
- If you want discontinued items to be available to customers, mark the Allow Discontinued Items check box.
- Mark the Enable Document Delivery check box to deliver Order Acknowledgment emails to addresses defined in the document delivery for that customer.
- To limit the number of item/order history detail records displayed, enter a value in the Recent Items Count field.
- Set the Order Type to 'Price Quote' or 'Both' to enable the Price Quote icon on the toolbar. This allows you the option to create a sales quote rather than a sales order. A quote will not have a payment page, and the Payment Type field will be disabled. To create only sales orders, select an Order Type of 'New'.
- Select one of the following Print Invoice options:
- Archive Only: When the AR business rule Use Archive is enabled, the invoice is reprinted from the stored PDF document instead of rendering from history data. If the document does not exist, a message will display.
- Both: When the AR business rule Use Archive is enabled, if you reprint the invoice report in Invoice History, the report will be reprinted from the PDF in the document store if it exists, otherwise it will be rendered from history data.
- Select a default Unit of Measure for the company from the drop-down list.
Click a command button to:
| Click | To |
| Save | Save the company configuration. |
| Refresh | Reload the data from the database. |
| Reset | Set all fields to their default values. |
| Company List | Return to the company list on the site settings screen. |